Introduction
Welcome to the PayGlobe Payment Gateway, your complete platform for payment management, dispute handling, and chargeback prevention.
Main Features
- Multi-gateway payments (IGFS, PayPal, Amazon Pay, Satispay, Bizum, Skrill)
- Dispute and chargeback management
- Pre-dispute alerts (Verifi, Ethoca)
- Auto-refund engine
- Risk analytics and dispute rate monitoring
- Payment links with QR code
- Bank integration (Unicredit AIS)
- Workflow automation
Dashboard
The dashboard is your control center for monitoring all activities in your merchant account.

Overview
At the top you'll find summary statistics:
- Transactions Today - Total number of transactions for the day
- Volume Today - Total amount processed today
- Success Rate - Percentage of successfully completed transactions
- Open Disputes - Number of disputes awaiting response
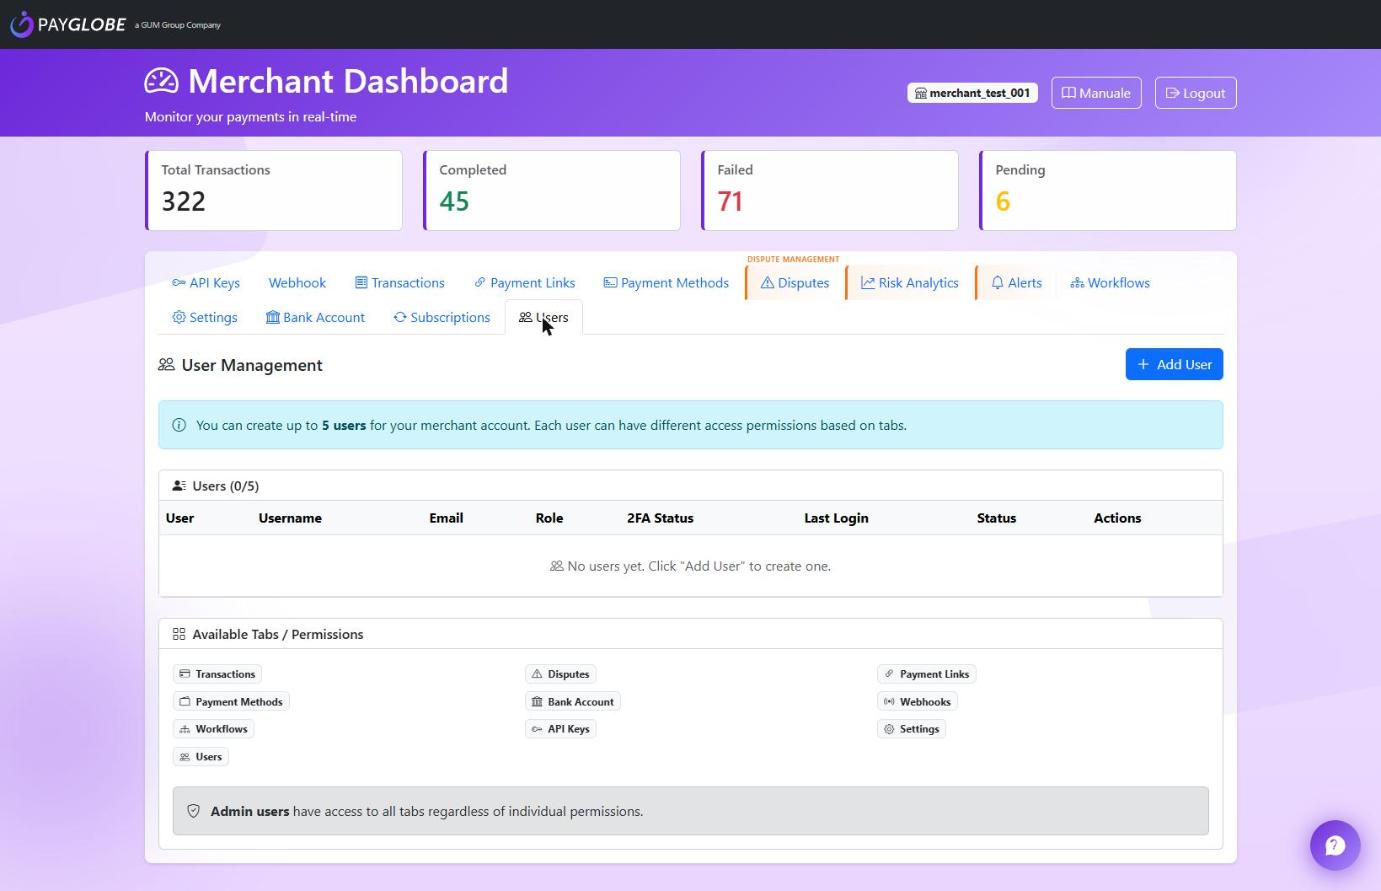
Available Tabs
| Tab | Description |
|---|---|
| Transactions | List and details of all transactions |
| Disputes | Chargeback and dispute management |
| Alerts | Pre-dispute alerts from Verifi/Ethoca |
| Risk Analytics | Dispute rate monitoring and risk assessment |
| Payment Links | Payment links and QR codes |
| Bank Account | Incoming bank transfer monitoring |
| Workflows | Process automation |
| Settings | Account configuration |
Transactions
View and manage all transactions processed by the gateway.
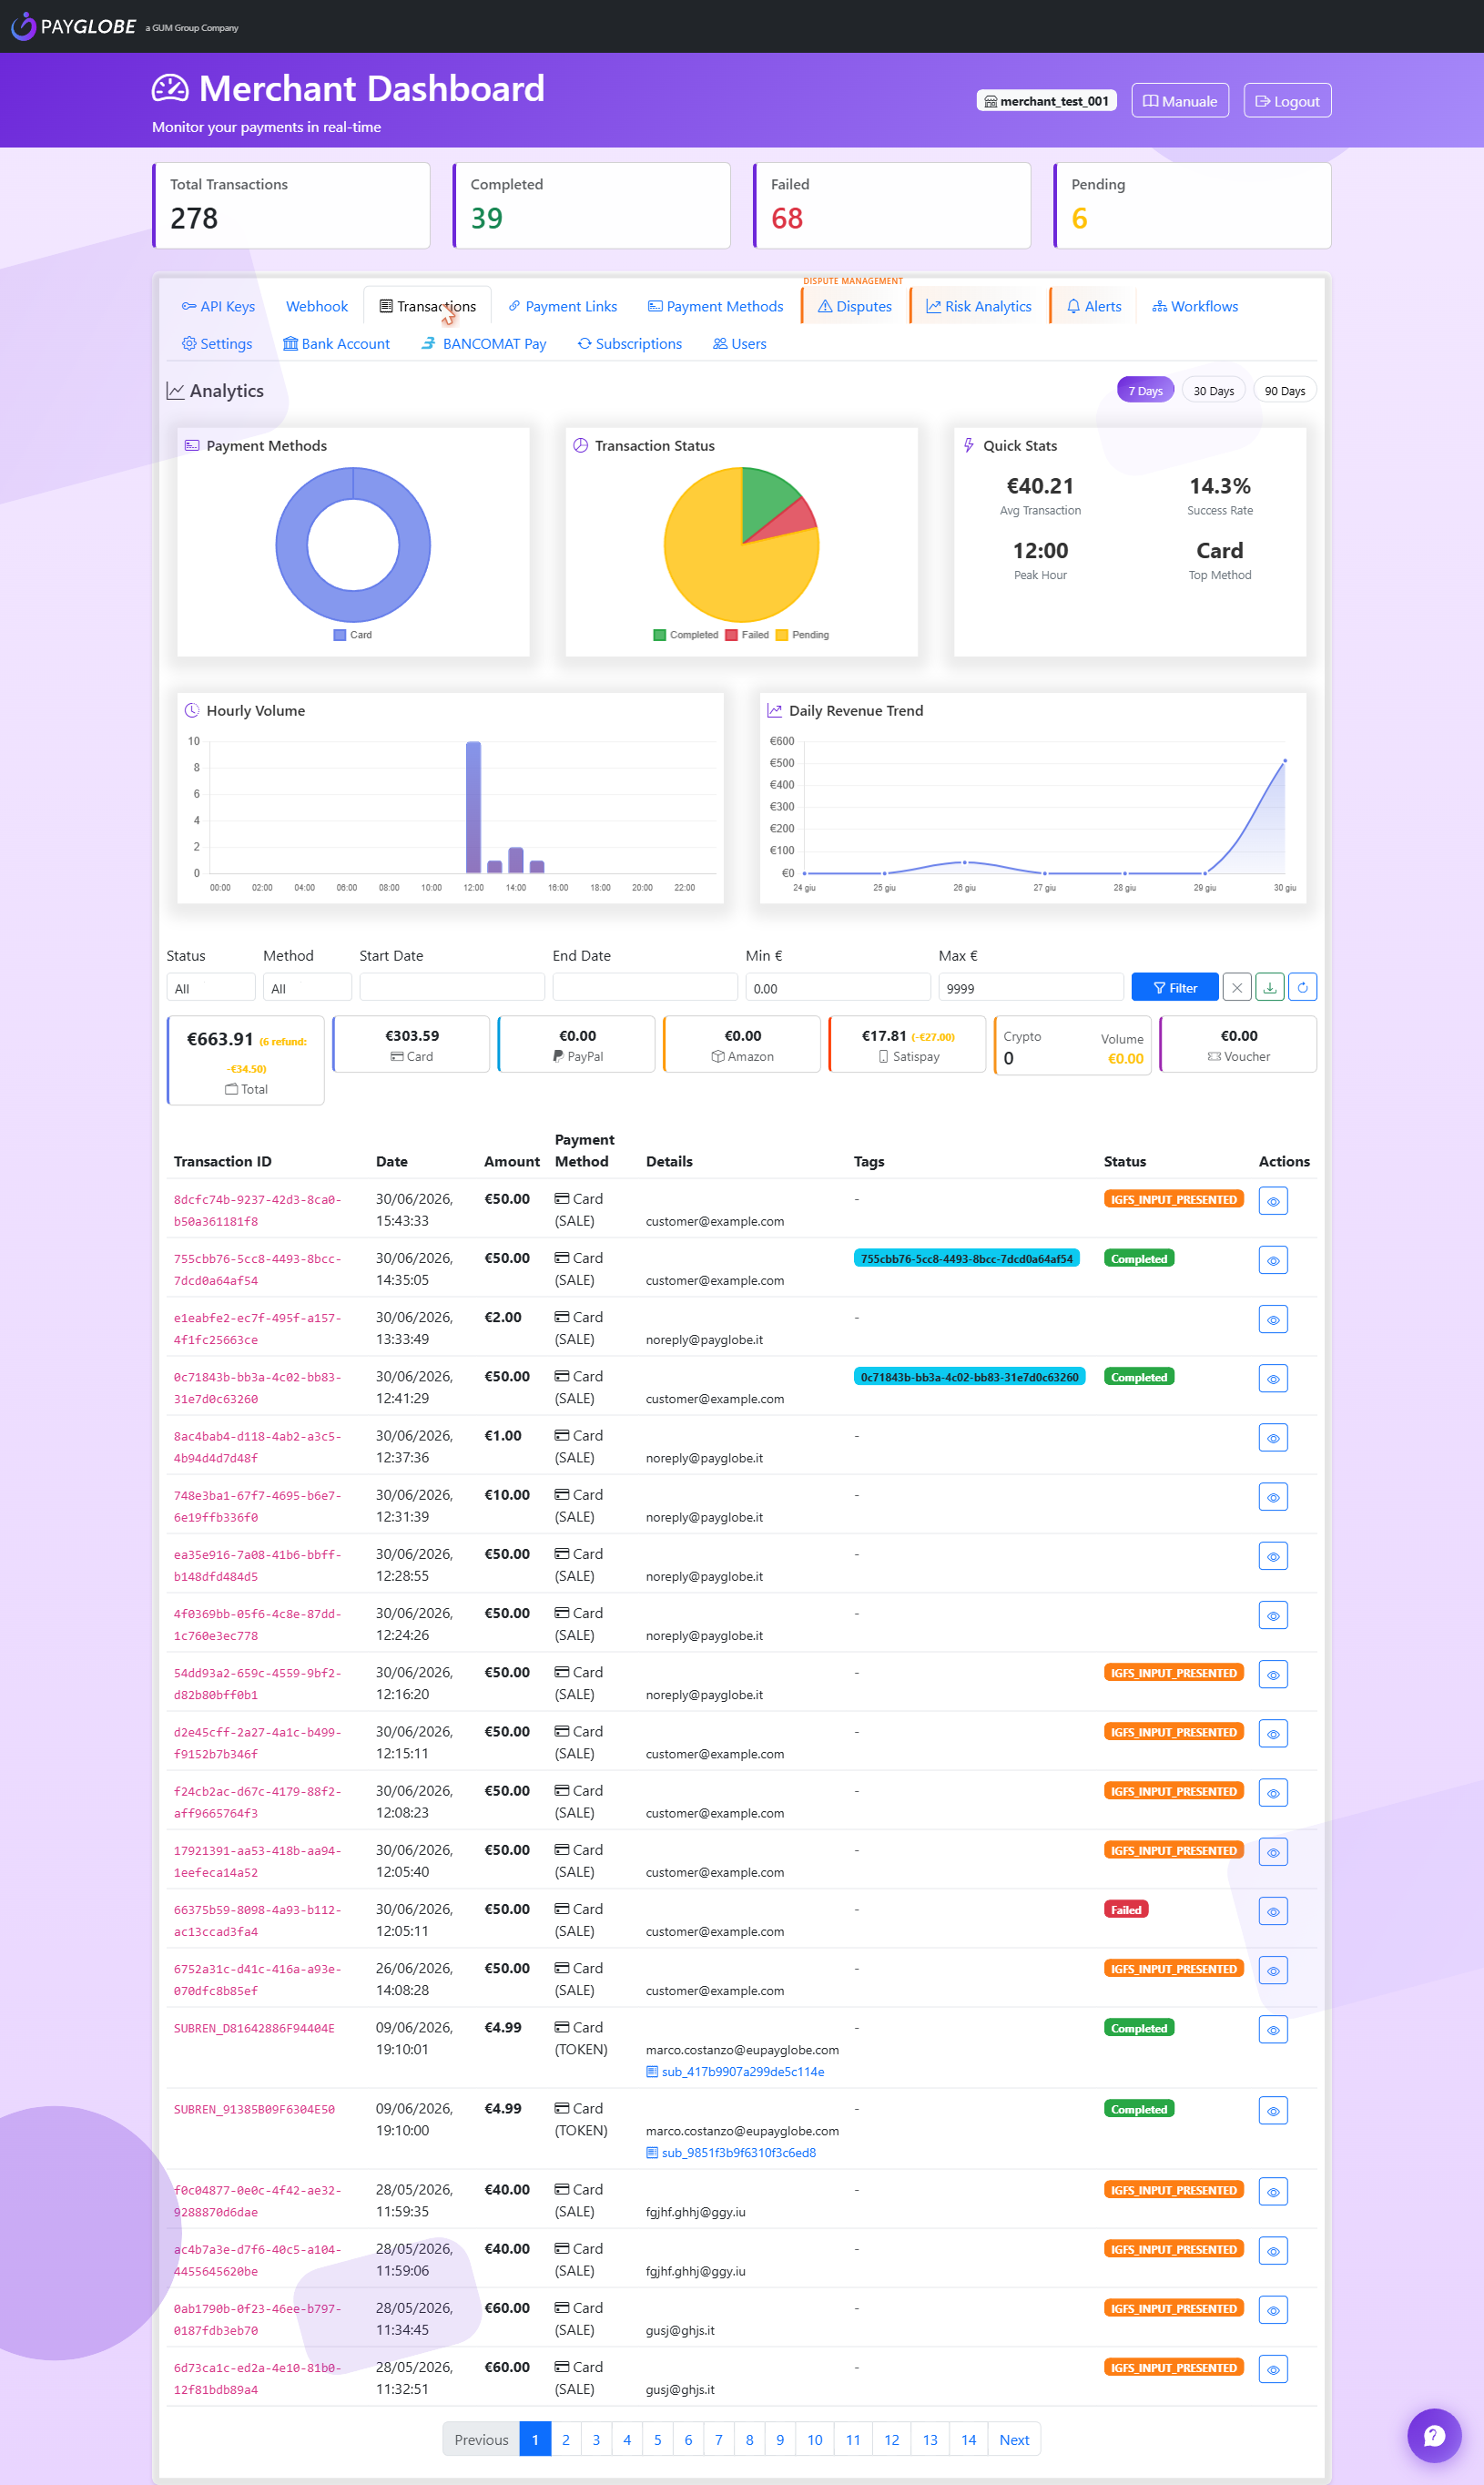
Available Filters
- Status - Filter by status (Completed, Failed, Refunded, etc.)
- Date - Date range
- Amount - Amount range
- Method - Card, PayPal, Bizum, etc.
Transaction Actions
View Details
Click the icon to see all transaction details including card data (masked), gateway used, and event timeline.
Refund
For COMPLETED transactions, you can issue a full or partial refund by clicking the icon.
The refund is recorded only when the gateway confirms it: if it is refused you get the reason and the transaction stays as it was, so a transaction marked refunded always means the money left. Partial refunds can be repeated until the captured amount is exhausted, and the status becomes PARTIAL_REFUNDED until then. On IGFS partial refunds are not available — that gateway can only reverse the whole amount, so a partial request is refused rather than reversing everything.
Transaction Details (Eye View)
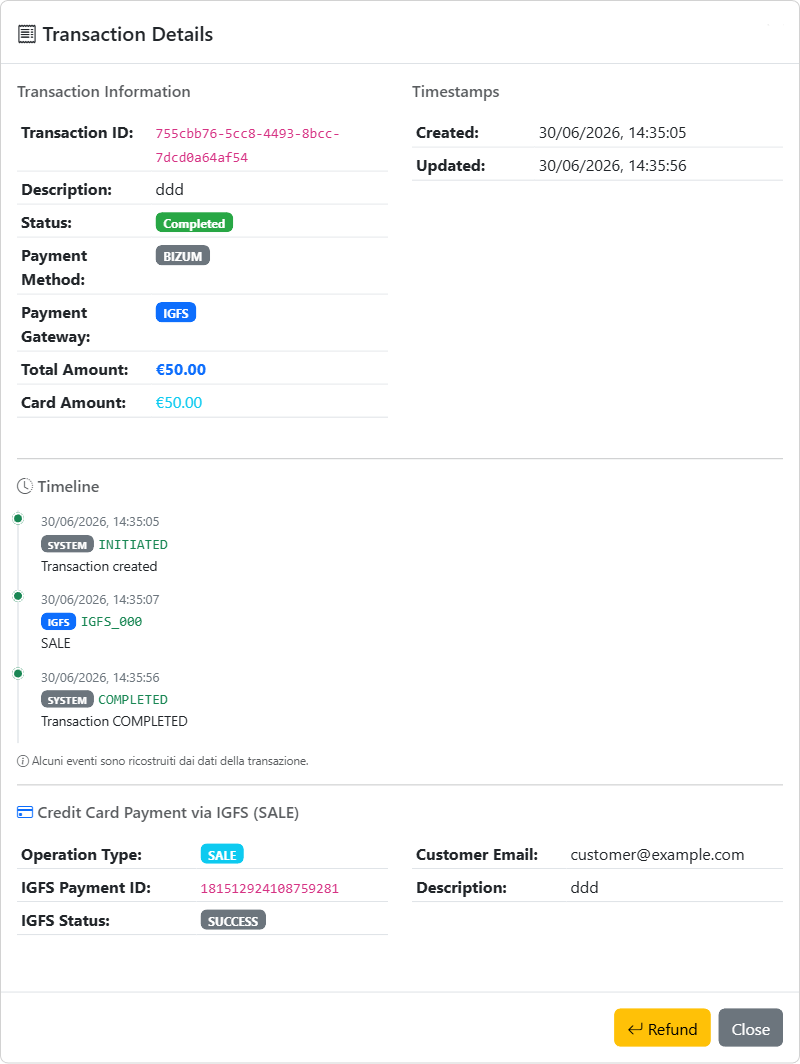
Clicking the icon opens the complete detail of a transaction, organized in four blocks:
- Transaction Information — Transaction ID, Description, Status, Payment Method, Payment Gateway, Total Amount and Card amount.
- Timestamps — Created and Updated.
- Timeline — chronological list of events, e.g.
SYSTEM INITIATED(transaction created) → the gateway event (IGFS IGFS_000 / SALE, or a Bizum/Shift4/PayPal authorization) →SYSTEM COMPLETED. Some events are reconstructed from the transaction data when not explicitly logged. - Payment leg details — gateway-specific data: for IGFS the Payment ID, operation type (SALE / PREAUTH / CAPTURE) and IGFS status; for Bizum the Redsys order,
Ds_Response(0000= authorized) and authorization code; for the other gateways the corresponding identifiers.
Note on the gateway shown
Every transaction created via the SDK initializes an IGFS hosted-page leg by default (the card path). If the buyer then pays with another method (e.g. Bizum), the Payment Method is the real one (BIZUM) while the leg details may still show the leftover IGFS initialization. The actual charge is identified by the leg that carries an authorization code (e.g. Bizum Ds_Response 0000); an IGFS leg without an authorization code was only the page setup, not a charge — so there is no double charge.
Tip
Use the "Export" function to download transactions in CSV format for accounting reconciliation.
Disputes (Chargebacks)
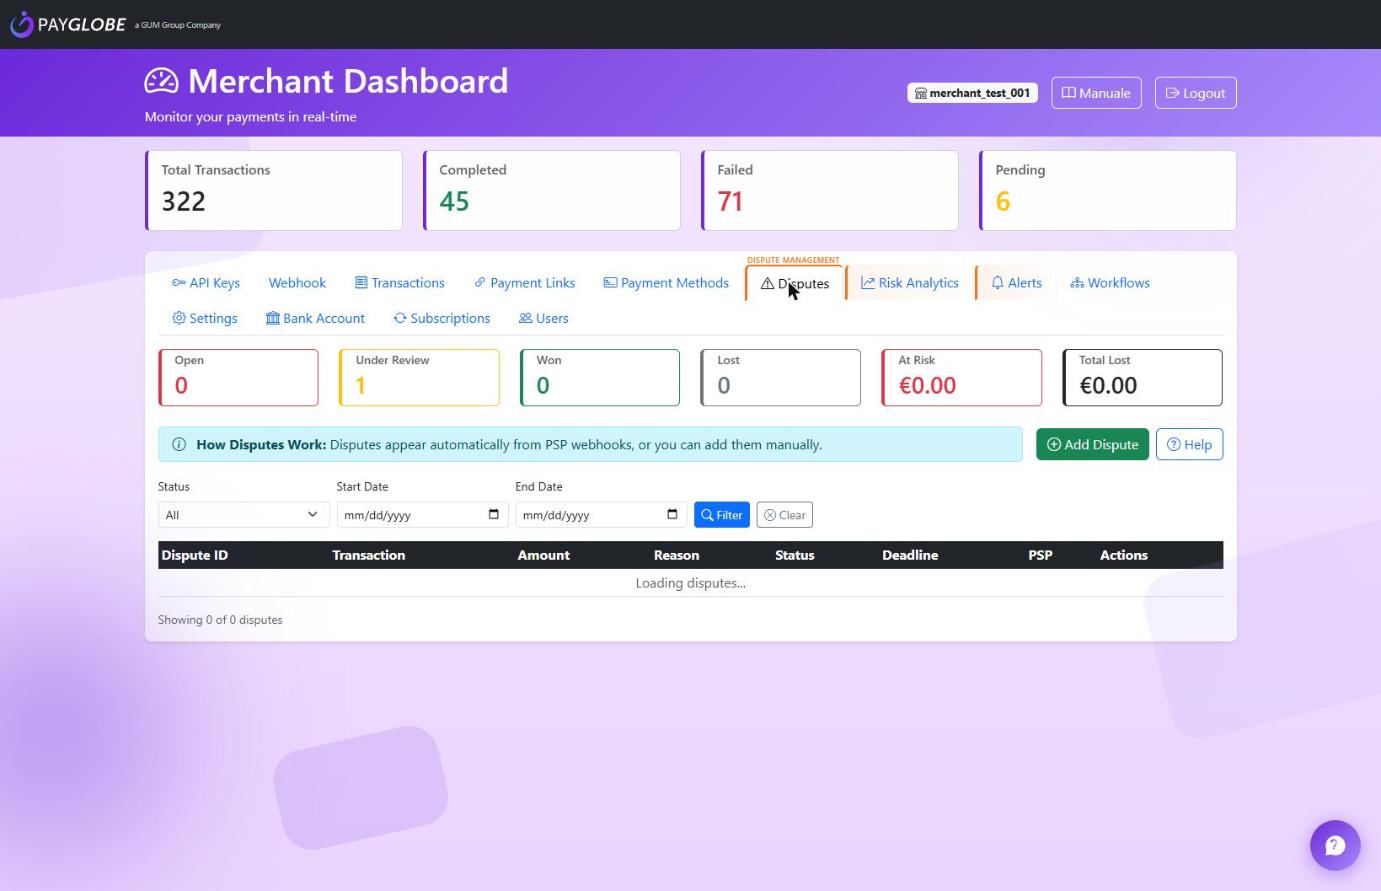
The Disputes tab shows all chargebacks received from card networks and pre-dispute alerts.
Dispute Status
| Status | Color | Description |
|---|---|---|
| Alert (Pre-Dispute) | Purple | Alert received from Verifi/Ethoca - not yet a formal chargeback |
| Open | Red | Chargeback opened, awaiting response |
| Under Review | Yellow | Evidence submitted, under bank review |
| Evidence Required | Cyan | Additional evidence needed |
| Won | Green | Dispute won - funds returned |
| Lost | Gray | Dispute lost - funds debited |
Responding to a Dispute
- Click the icon to open the dispute details
- Review the details: amount, reason, deadline
- Upload evidence (receipts, shipping tracking, customer emails, etc.)
- Write a response in the "Merchant Response" field
- Click "Submit Response" before the deadline
Important
Always respect the Response Deadline! After expiration, you can no longer submit evidence and the dispute will be automatically lost.
Accepted Evidence Types
- RECEIPT - Receipt or invoice
- SHIPPING_PROOF - Proof of shipment (tracking)
- DELIVERY_CONFIRMATION - Delivery confirmation with signature
- CUSTOMER_COMMUNICATION - Emails or chats with the customer
- TERMS_OF_SERVICE - Terms of service/refund policy
- PRODUCT_DESCRIPTION - Description of the product sold
Pre-Dispute Alerts
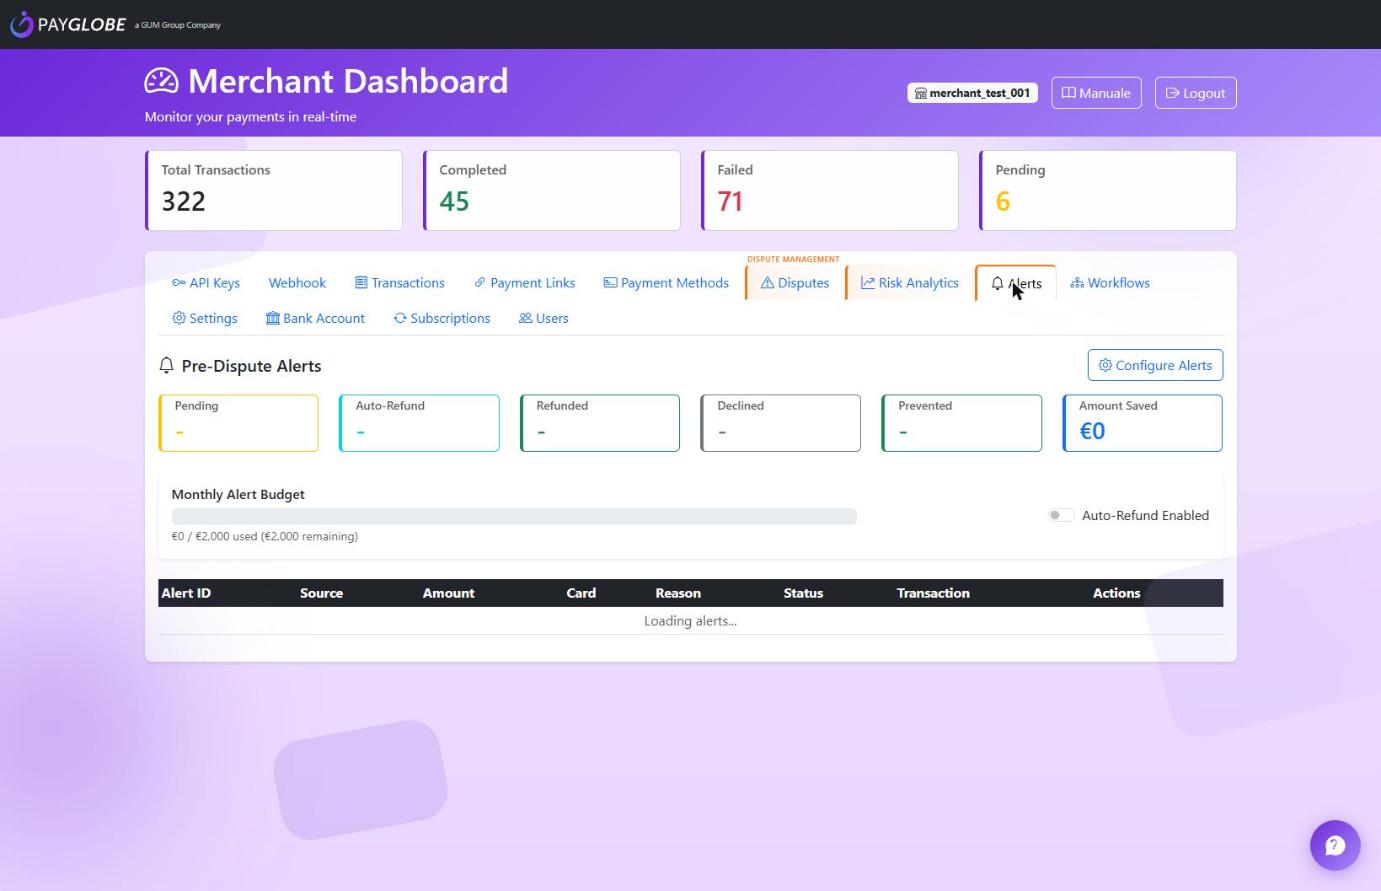
Pre-dispute alerts allow you to prevent chargebacks by refunding BEFORE they become formal.
Alert Sources
Verifi RDR
Rapid Dispute Resolution by Visa. Receive real-time alerts when a cardholder initiates a dispute.
Verifi CDRN
Cardholder Dispute Resolution Network. Even earlier alerts, when the customer contacts the bank.
Ethoca
Mastercard fraud prevention system. Reports of confirmed fraud from the issuer.
Auto-Refund Engine
Configure the system to automatically refund alerts that meet certain criteria:
| Parameter | Description |
|---|---|
| Min/Max Amount | Amount range for auto-refund. E.g.: 0-50 EUR = only refund small transactions |
| Delay (hours) | Wait time before refund. Allows you to see the alert and decide manually |
| Excluded Codes | Reason codes NOT to refund (e.g.: confirmed fraud) |
| Monthly Budget | Monthly limit for auto-refund. Once reached, alerts go to manual review |
Link with Disputes
Each received alert is automatically displayed in the Disputes tab with "Alert (Pre-Dispute)" status. This allows you to see both pre-dispute alerts and formal chargebacks in one place.
Risk Analytics
Monitor your dispute rate to avoid sanctions from card networks.
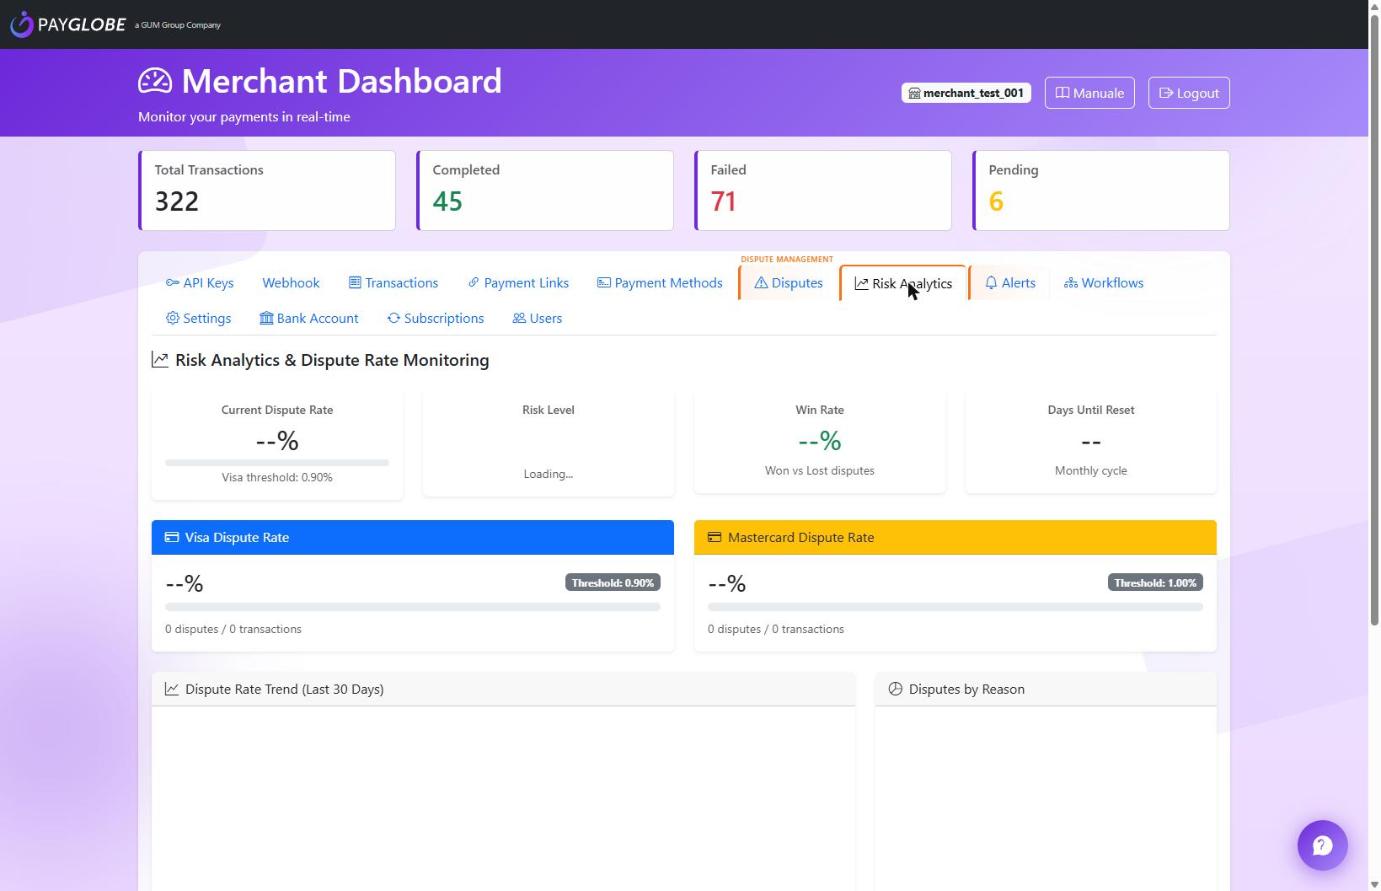
Card Network Thresholds
| Network | Threshold | Consequences |
|---|---|---|
| Visa | 0.90% | VDMP (Visa Dispute Monitoring Program) - Fines and monitoring |
| Mastercard | 1.00% | ECP (Excessive Chargeback Program) - Progressive fines |
Monitored Metrics
- Current Dispute Rate - Dispute/transaction ratio for the current month
- Risk Level - LOW, MODERATE, HIGH, CRITICAL
- Win Rate - Percentage of disputes won
- Amount at Risk - Total amount in open disputes
- Prevention Rate - Effectiveness of the alert prevention system
Risk Levels
| Level | Dispute Rate | Recommended Action |
|---|---|---|
| LOW | < 0.50% | Optimal situation, continue monitoring |
| MODERATE | 0.50% - 0.75% | Attention, analyze the causes of disputes |
| HIGH | 0.75% - 0.90% | Activate aggressive prevention, consider auto-refund |
| CRITICAL | > 0.90% | URGENT: Risk of sanctions, contact support |
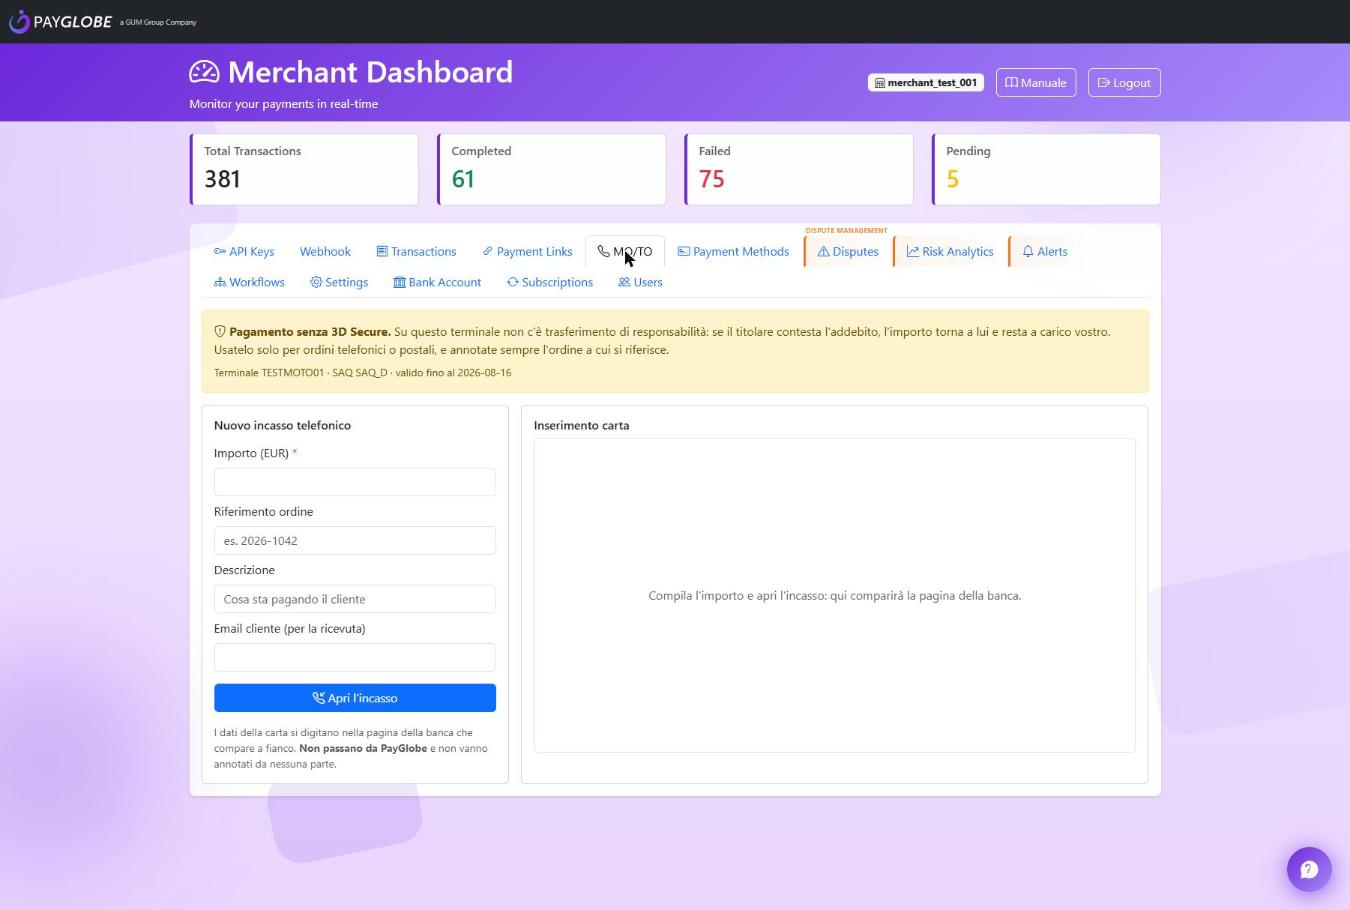
MO/TO — Telephone orders
Take a payment over the phone: the customer reads out the card details and your operator types them into the bank's page, inside your dashboard.
Before you can use it
The tab only appears once PayGlobe has switched it on, and that happens after you provide two things: the dedicated MO/TO terminal issued by your acquirer (a separate one, with 3D Secure disabled) and your PCI SAQ. The tab closes by itself the day the SAQ expires — renew it before that date.
Taking a payment
- Open the MO/TO tab and enter amount, order reference and description
- Click "Apri l'incasso": the bank's card page opens on the right
- Type the card details your customer reads out, in that page
- The result appears on its own — it comes from the bank, not from the page
Payment Links
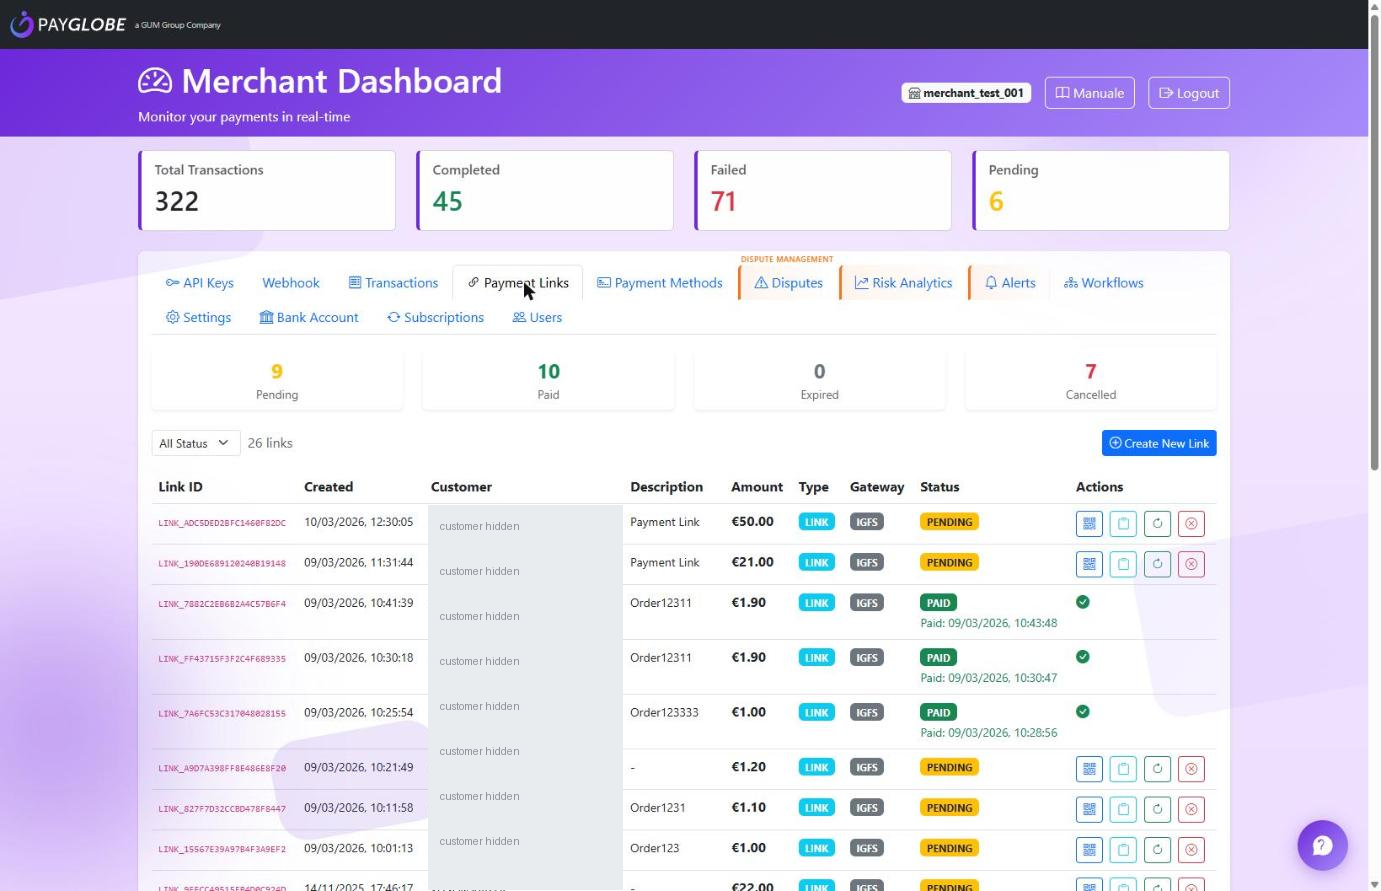
Create shareable payment links via email, SMS, WhatsApp, or QR code.
https://api.payglobe.it/paymentgw/payment/checkout/<id>), not to the payment
provider: the customer sees the same page as your online store, with every method you have enabled
(card in an iframe, PayPal, Bizum, Skrill, crypto…). When the payment completes we notify the
webhook URL you configured in the Webhooks tab — you do not configure anything on the provider side.
Creating a Payment Link
- Click "Create Payment Link" in the Payment Links tab
- Enter amount, description, and customer data
- Choose the mode: LINK (you share it), MAIL (we email it to the customer), or SMS (there is no SMS channel: you get the link and send it yourself)
- Set the expiration (1-365 days)
- Click "Create" and copy the link or QR code
A link carries one payment attempt: if the payment fails for good, create a new link.
The email your customer receives
With linkType=MAIL PayGlobe emails the link for you. The default message
already says who is asking for the money, how much, what for, and until when the link
is valid — but you can rewrite it: Email template, next to
"Create New Link".
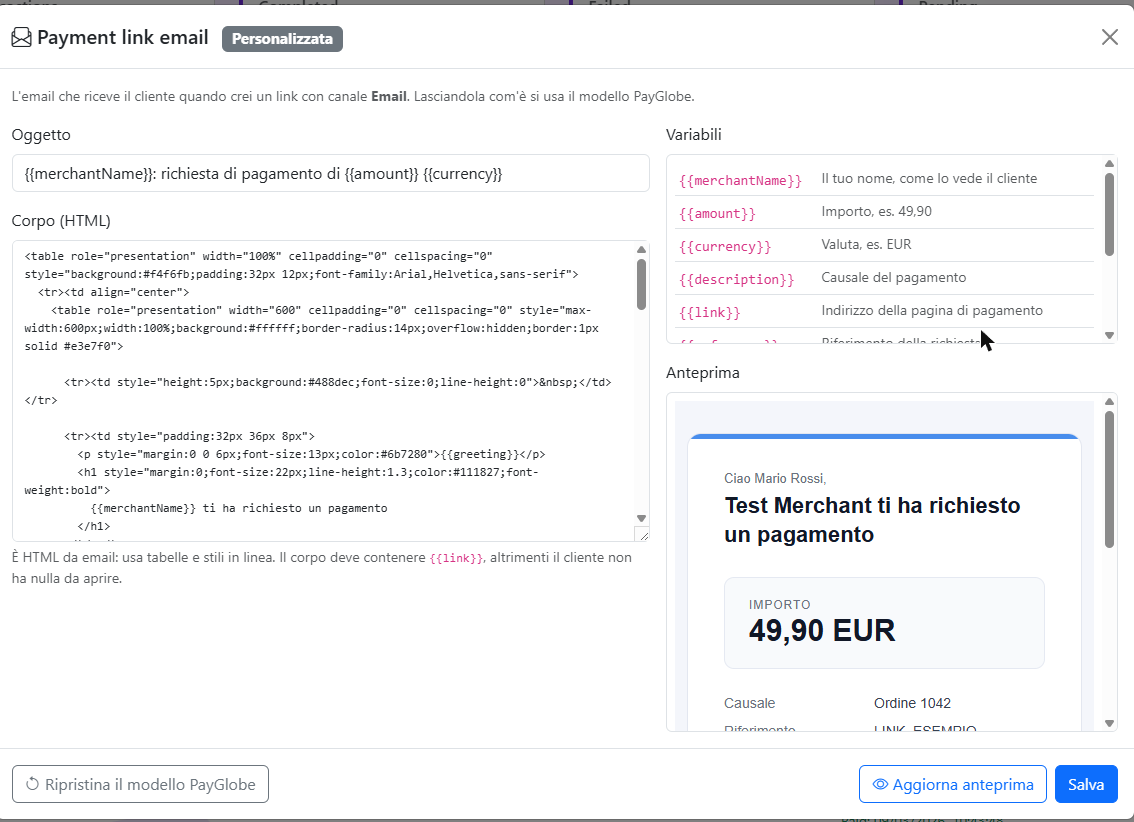
Two things worth knowing before you edit it:
- The body must keep
{{link}}somewhere — without it the customer has nothing to open, so the save is refused. - It is email HTML: tables and inline styles. Anything that runs
(scripts, event handlers,
javascript:links) is stripped when you save, and we tell you when that happens.
Common Uses
- Invoicing - Send invoices with payment link via email
- QR Code POS - Print QR codes for in-person payments
- Social Commerce - Share links on WhatsApp/Instagram
- Remote Sales - Accept payments without integrated checkout
Tip
Include the QR code in invoice emails - many customers prefer scanning rather than clicking links.
Bank Account (AIS)
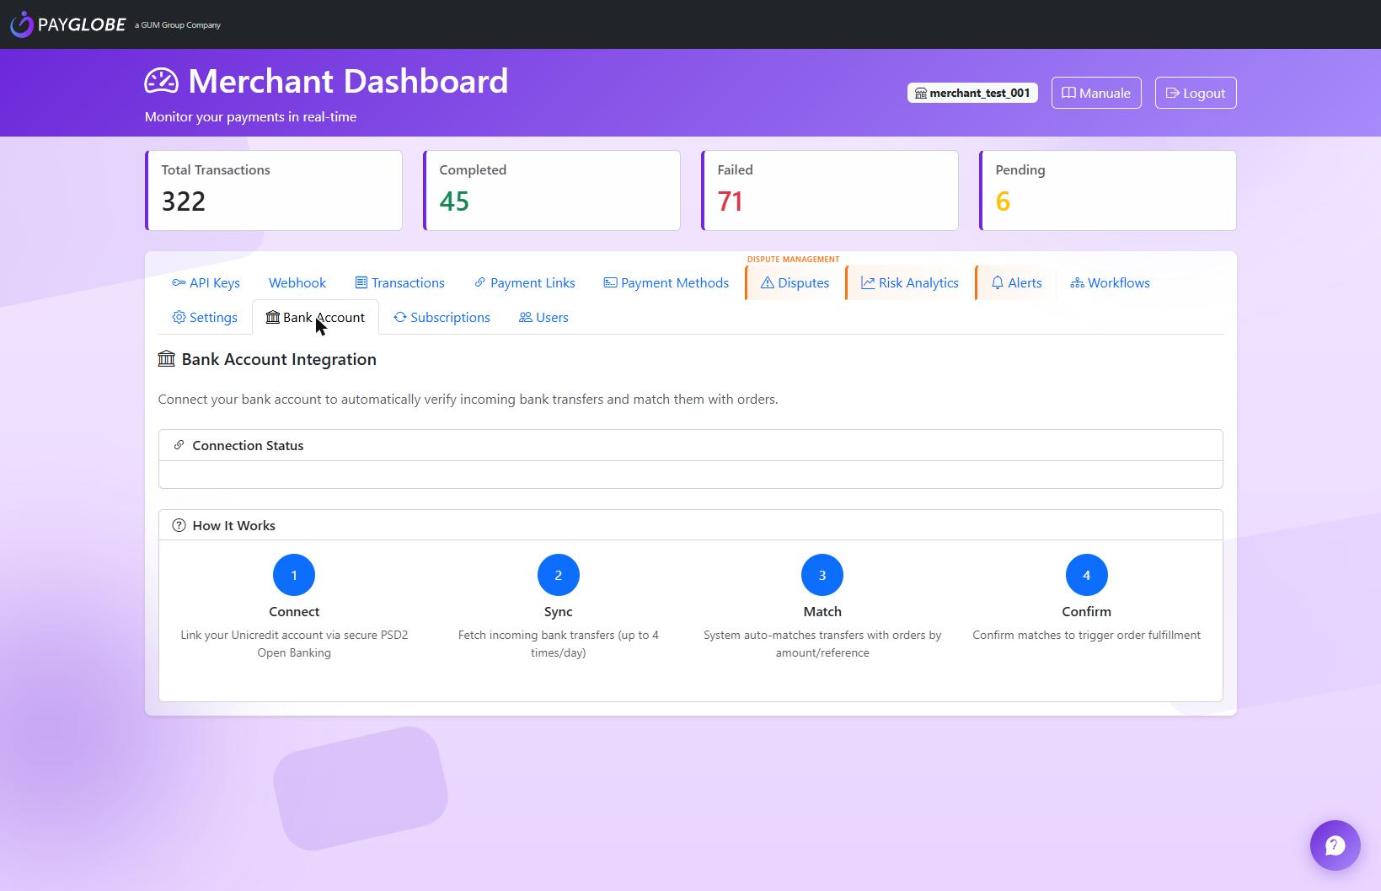
Monitor incoming bank transfers to your business bank account for automatic order matching and reconciliation.
Supported Banks
PayGlobe integrates with major European banks via PSD2 Open Banking APIs (Account Information Services - AIS):
| Bank | Country | Status |
|---|---|---|
| Unicredit | Italy, Germany, Austria | Available |
| Intesa Sanpaolo | Italy | Coming Soon |
| BNL - BNP Paribas | Italy | Coming Soon |
| Deutsche Bank | Germany | Coming Soon |
| ING | Netherlands, Italy, Germany | Coming Soon |
| Revolut Business | EU | Planned |
How to Connect Your Bank Account
- Click "Connect Bank Account" - In the Bank Account tab, click the green "Connect Bank Account" button to start the process
- Select your bank - Choose your bank from the list of supported institutions
- Authorize access via SCA - You will be redirected to your bank's website (e.g., Unicredit Online Banking) to log in and authorize PayGlobe to access your account information
- Select accounts - Choose which bank accounts you want to monitor for incoming transfers
- Confirm consent - Review and confirm the consent (valid for 90 days, then renewal required)
Security & Privacy
PayGlobe uses read-only access to your account. We can only view incoming transactions - we cannot initiate payments or access your credentials. All connections use bank-grade encryption and comply with PSD2 regulations.
Automatic Polling
Once connected, the system automatically fetches new incoming transfers:
- Frequency - Up to 4 times per day (PSD2 regulatory limit)
- Schedule - Recommended: 8:00, 12:00, 16:00, 20:00
- Manual refresh - You can trigger a manual sync from the dashboard (counts toward daily limit)
Transfer Matching
The system tries to automatically match incoming transfers to your orders using:
- Payment Reference - Searches for order IDs/references in the transfer description (causale)
- Amount - Exact match of the expected payment amount
- Customer Name - Cross-reference with customer data when available
- Manual Matching - For unmatched transfers, you can manually link them to orders from the dashboard
Use Cases
Order Fulfillment
Automatically release orders when bank transfer payment is confirmed. No more manual checking!
Reconciliation
Match incoming payments with invoices for faster accounting and reduced manual work.
PSD2 Limit
PSD2 regulations limit API calls to 4 times per day per account. Use polling strategically (e.g.: morning, noon, afternoon, evening). The remaining polls for today are shown in the dashboard.
Pro Tip
Include a unique order reference in your payment instructions (e.g., "Payment for Order #12345"). This enables automatic matching and faster order processing.
Workflows
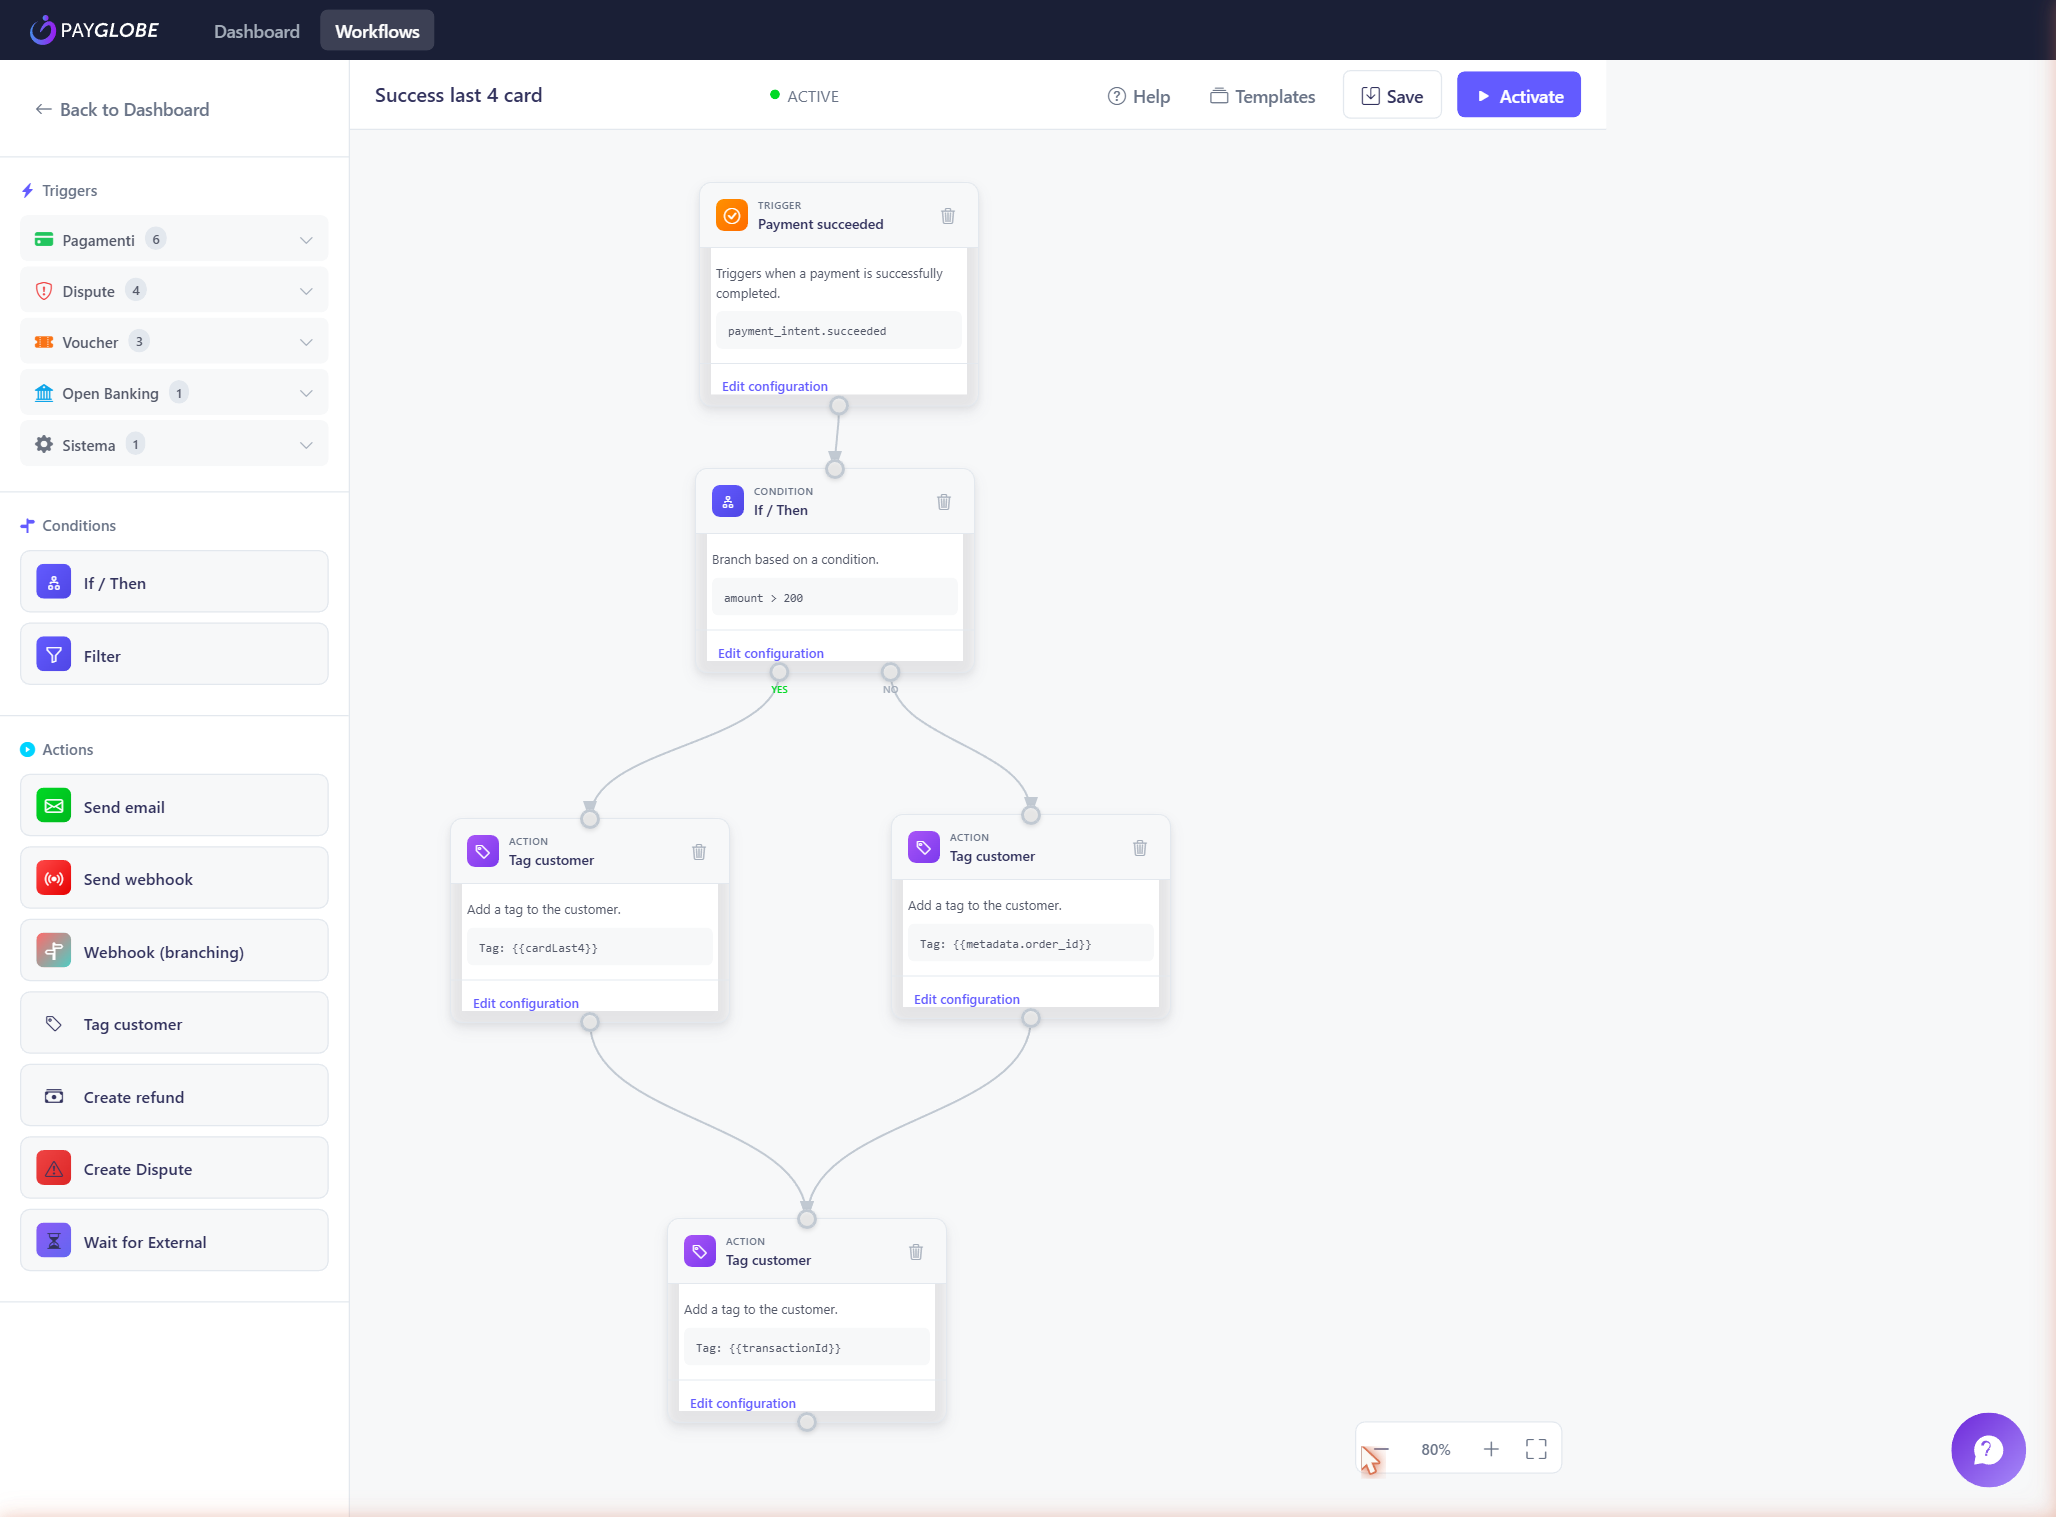
Automate actions based on payment events with the visual workflow builder.
Available Templates
- Personalize Orders - Send personalized emails after payment
- Dispute Response - Automatic notification when a dispute arrives
- Refund Processing - Workflow for refund approval
Available Triggers
| Trigger | Description |
|---|---|
| PAYMENT_COMPLETED | When a payment succeeds |
| PAYMENT_FAILED | When a payment fails |
| DISPUTE_OPENED | When a dispute is opened |
| ALERT_RECEIVED | When a pre-dispute alert arrives |
| REFUND_ISSUED | When a refund is issued |
API Keys
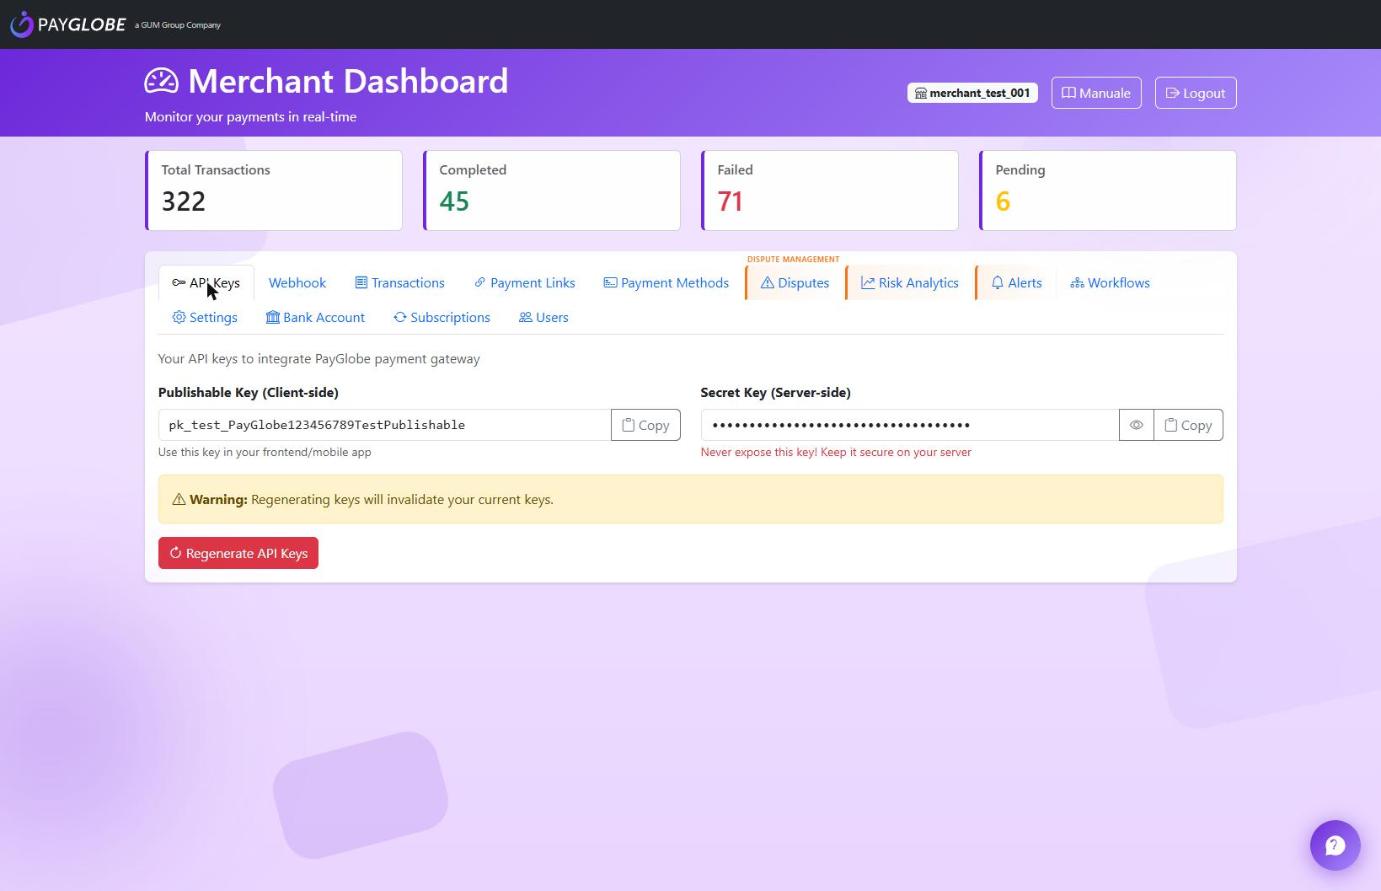
Manage API keys for programmatic integration.
Key Types
| Type | Prefix | Usage |
|---|---|---|
| Publishable Key | pk_test_ / pk_live_ |
Frontend, checkout page (can be exposed) |
| Secret Key | sk_test_ / sk_live_ |
Backend, API calls (NEVER expose!) |
API Authentication
Authorization: Bearer sk_test_YourSecretKeySecurity
The Secret Key must NEVER be exposed in the frontend or in public repositories. Use it only in server-side backend.
AI Agents
Let an AI assistant work on your account — read your takings, prepare payment links, issue refunds — with only the permissions you choose and a spending limit you set.
Why an agent gets its own key
You have one secret key, and your website and your systems already use it. If you gave it to an assistant, taking access away from the assistant would mean changing the key everything else depends on. So an agent gets a key of its own: revoking it changes nothing else.
Creating one
Open the AI Agents tab and choose New agent.
- Name it for what it does — it is what you will read when you have several and need to remove one.
- Say who runs it, if it is not you. An assistant run by an agency is not the same as one running on your own machine.
- Tick only the permissions it needs. Reading is enough for most assistants. Permissions that move money are marked.
- Set the limits if you granted refunds or captures. A maximum per operation is required; a daily maximum is worth setting too, or the per-operation limit can be worked around by repeating.
- Choose when it expires. Up to 90 days, and shorter is better.
Creating or removing an agent requires your secret key, not the publishable one: it is an owner's decision, not a everyday dashboard action.
What an assistant can be allowed to do
Reading your transactions, totals, payment links, disputes and subscriptions. And, if you allow it, three things that touch money: create payment links, refund a payment, and retry a failed subscription renewal.
Anything that moves money needs a ceiling from you, and the assistant is told those ceilings when it connects — including how much of today's allowance is left. It knows before it tries.
Watching what it does
The clock icon next to an agent shows its recent calls: what it asked for, for how much, and whether it was allowed.
Refused calls are kept on purpose. An assistant can be talked into things — it reads order descriptions, emails and tickets written by other people, and that text can try to give it instructions. An agent repeatedly asking for permissions it does not have is the sign that something is pushing it. That is exactly what you want to see.
Removing access
Letting an agent do the reordering
An agent can charge a card your customer has already saved — a weekly refill, a standing order — but only in a shape you control. You write the order first, with the amount and what kind of thing it is; the agent can only confirm it. It never picks the figure itself.
On top of your usual ceilings you can then say what it may buy: an amount per purchase, an amount per day, how many purchases per day, and which categories at all. That last one matters more than it looks: ten reorders of three euros break no money limit and are still ten deliveries nobody asked for.
* for “everything else”.
Revoking takes effect on the agent's next call. Nothing else on your account is touched. If an assistant starts behaving oddly, revoke first and work out why afterwards — you can always issue a new key in a few seconds.
Technical setup, including how to connect a tool such as Claude Desktop, is in the integration guide.
Webhooks
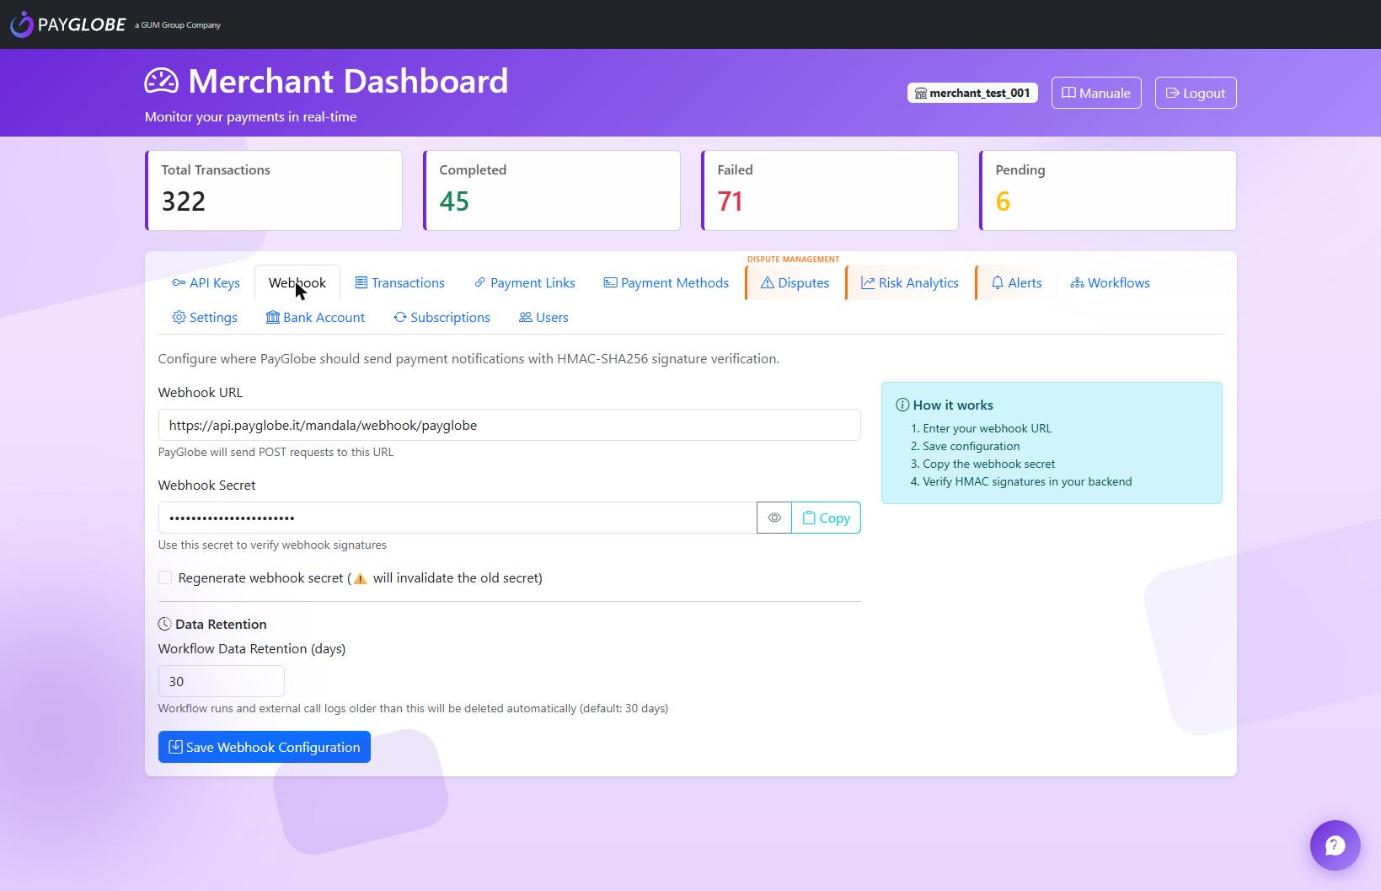
Receive real-time notifications when events occur in the gateway.
Configuration
- Go to Settings > Webhook Configuration
- Enter your Webhook URL (e.g.: https://yourserver.com/webhook)
- Copy the automatically generated Webhook Secret
- Implement signature verification in your backend
http(s) URLs (use
https in production) whose host resolves to a public address are accepted:
localhost, private networks (10.x, 172.16–31.x,
192.168.x), 169.254.x.x and host names that do not resolve are refused
when you save, with the reason shown. The same check runs before every delivery: if the host later
points to an internal address, the notification is not sent. The same applies to the URLs of the
Send Webhook, Webhook Branching and Wait for External workflow nodes. To test from your own
computer, use a public tunnel (e.g. ngrok) or webhook.site.
Signature Verification
Each webhook includes an X-PayGlobe-Signature header with HMAC-SHA256 signature:
// Node.js example
const crypto = require('crypto');

function verifyWebhook(payload, signature, secret) {
    const hmac = crypto.createHmac('sha256', secret);
    hmac.update(payload);
    return hmac.digest('base64') === signature;
}
Webhook Events
payment.completed- Payment completedpayment.failed- Payment failedrefund.issued- Refund issueddispute.opened- New disputedispute.resolved- Dispute resolvedalert.received- Pre-dispute alert received
Payment Methods
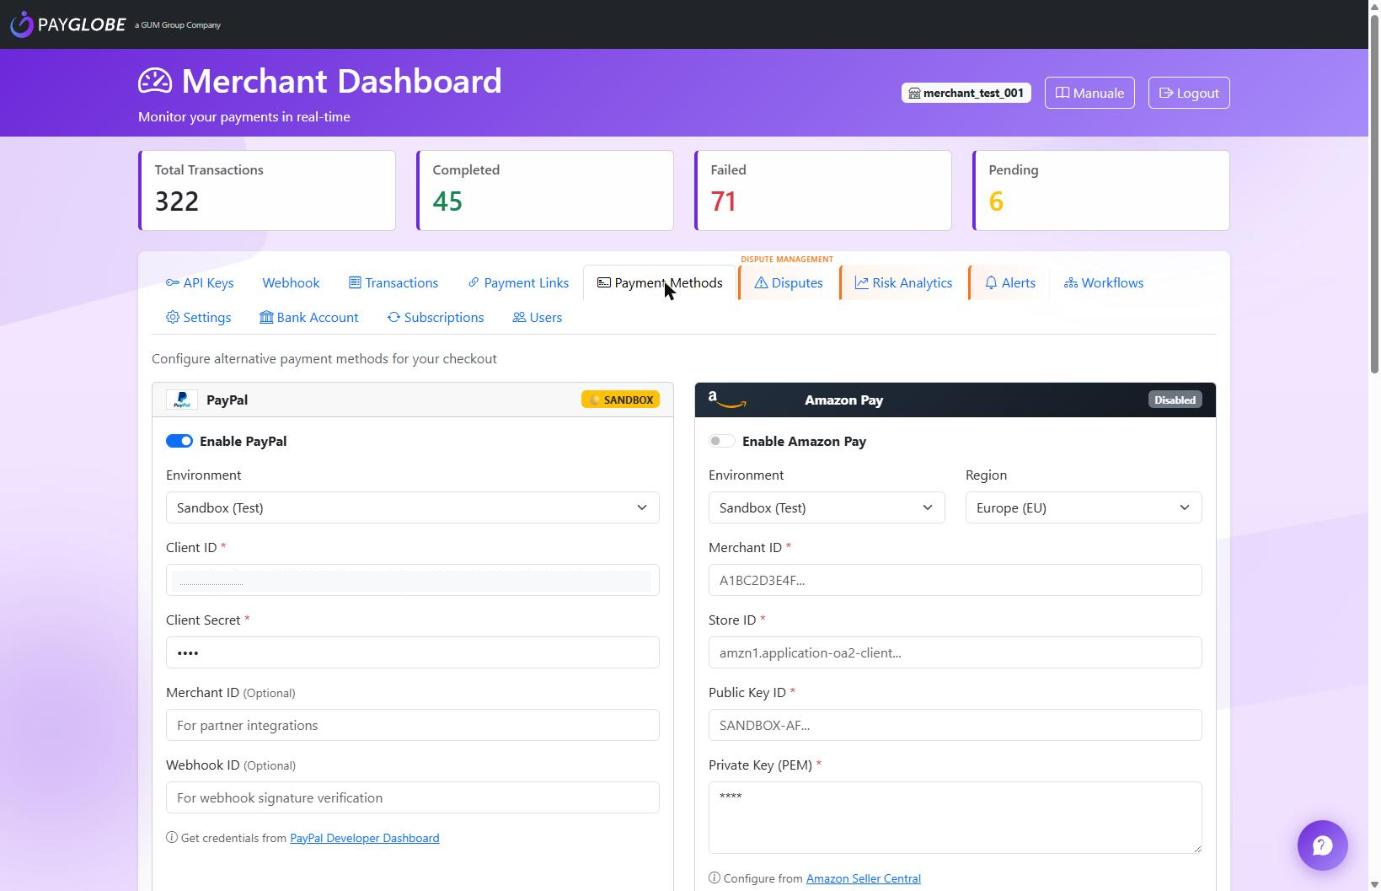
Configure accepted payment methods.
Available Gateways
| Gateway | Type | Configuration |
|---|---|---|
| IGFS | Credit cards | Merchant ID, Secret Key |
| PayPal | Wallet | Client ID, Client Secret |
| Amazon Pay | Wallet | Merchant ID, Public/Private Key |
| Satispay | Mobile payment | Key ID, Private Key |
| Bizum (Redsys) | Instant account-to-account (Spain only) | Merchant Code (FUC), Terminal, Secret Key — or Redsys API Key |
| Skrill (Quick Checkout) | Skrill wallet — and from the same page card, Neteller, Rapid Transfer, PaysafeCard | Skrill account email, Secret word (Developer Settings), API/MQI password for refunds |
| Shift4 | Credit cards | Merchant ID, Signature Key |
Recurring Payments (Subscriptions)
Charge your customers automatically on a recurring schedule — subscriptions, memberships, "Netflix-style" billing. It builds on Card Tokenization: the card is saved as a token on the first payment and reused for every following charge, with no buyer interaction.
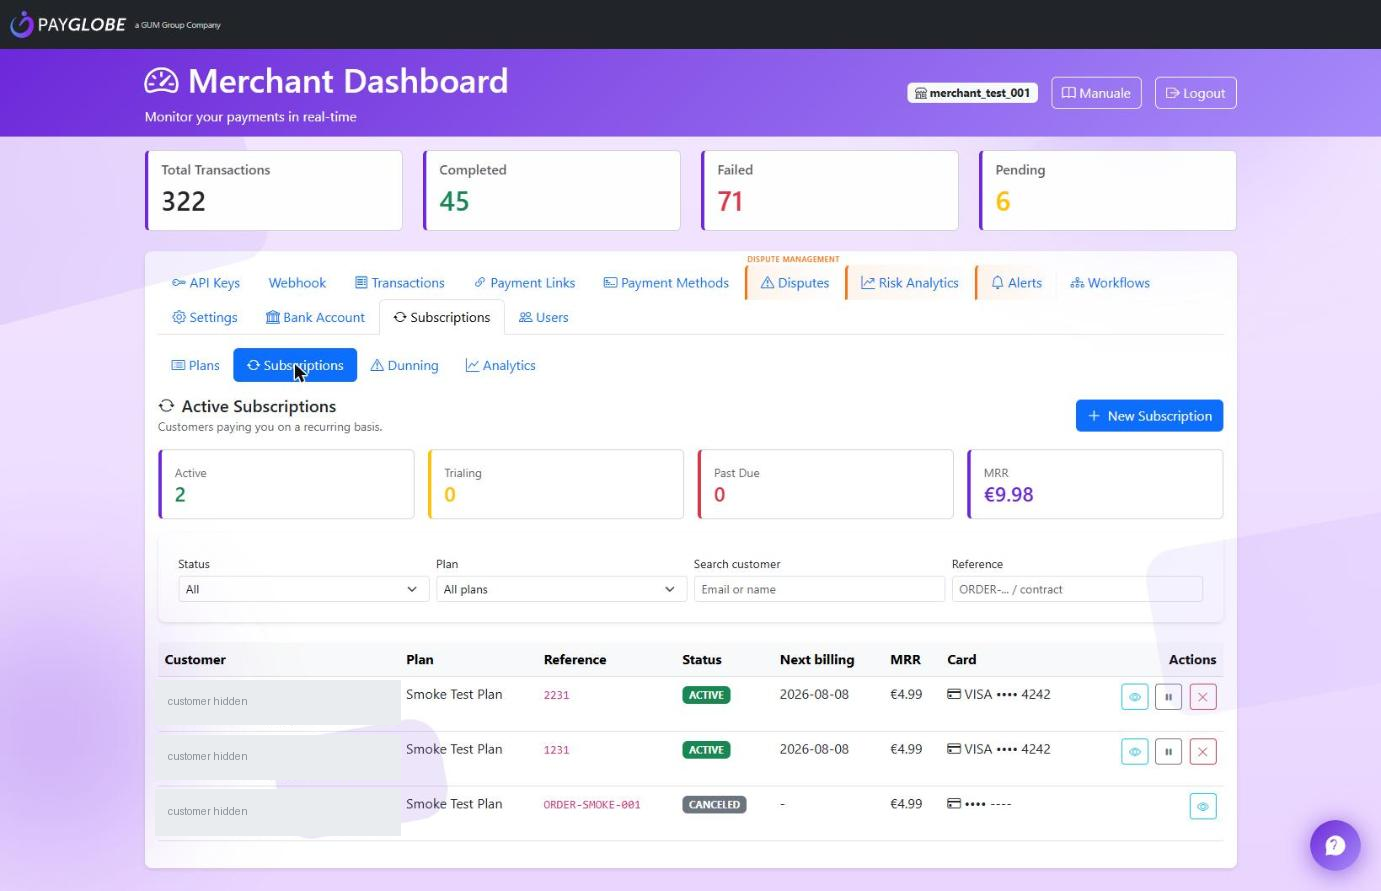
Everything lives under the Subscriptions tab of the dashboard, which has four sub-tabs: Plans, Subscriptions, Dunning and Analytics.
The two building blocks
- A Plan is what you sell on a recurring basis: price, currency, interval (monthly, yearly…), optional trial, setup/cancellation fees, and any custom fields you want to collect. You define it once.
- A Subscription is one customer enrolled in one plan, with their saved card, status and next billing date.
Step 1 — Create a plan
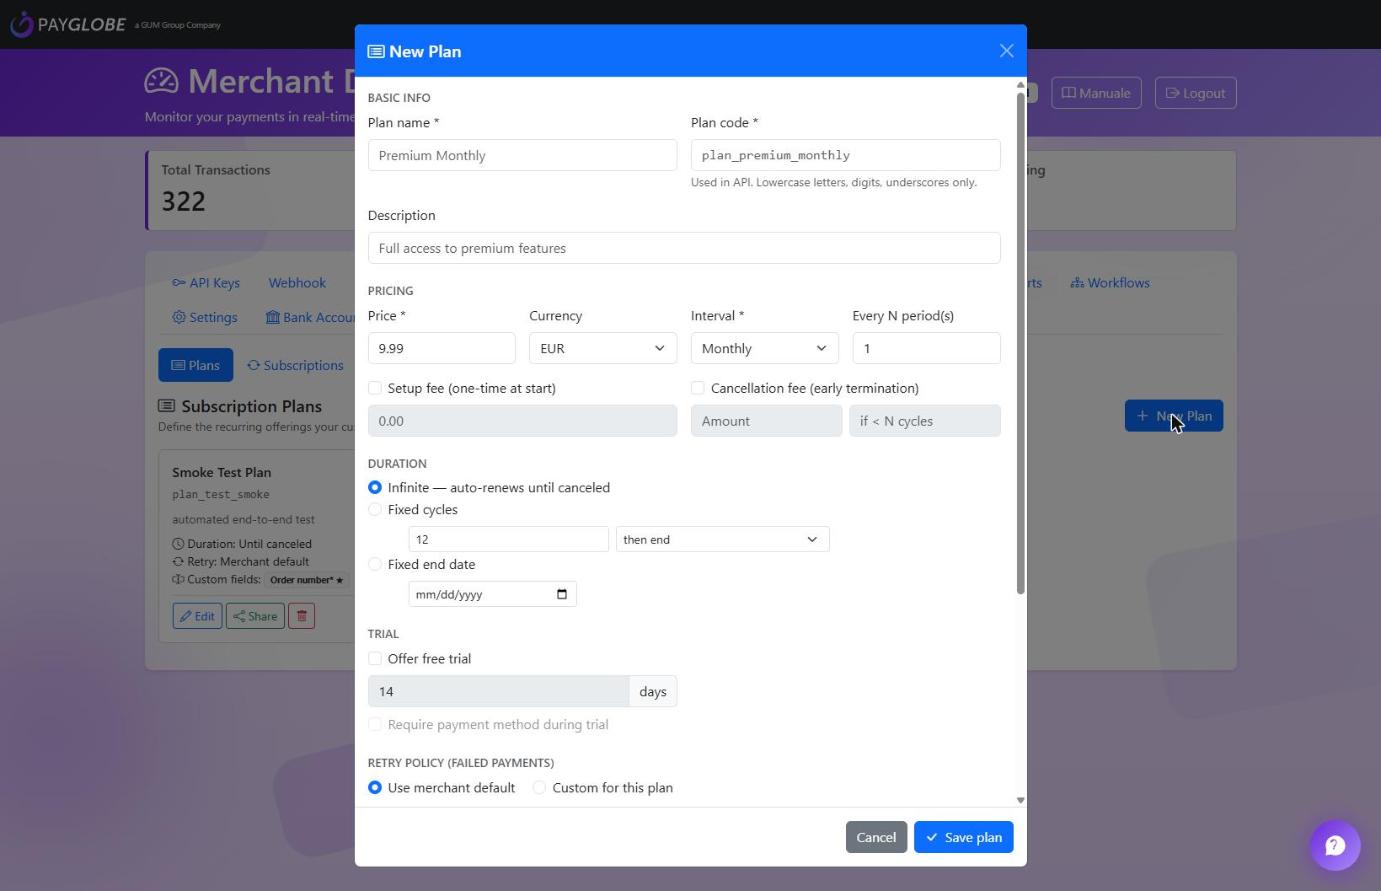
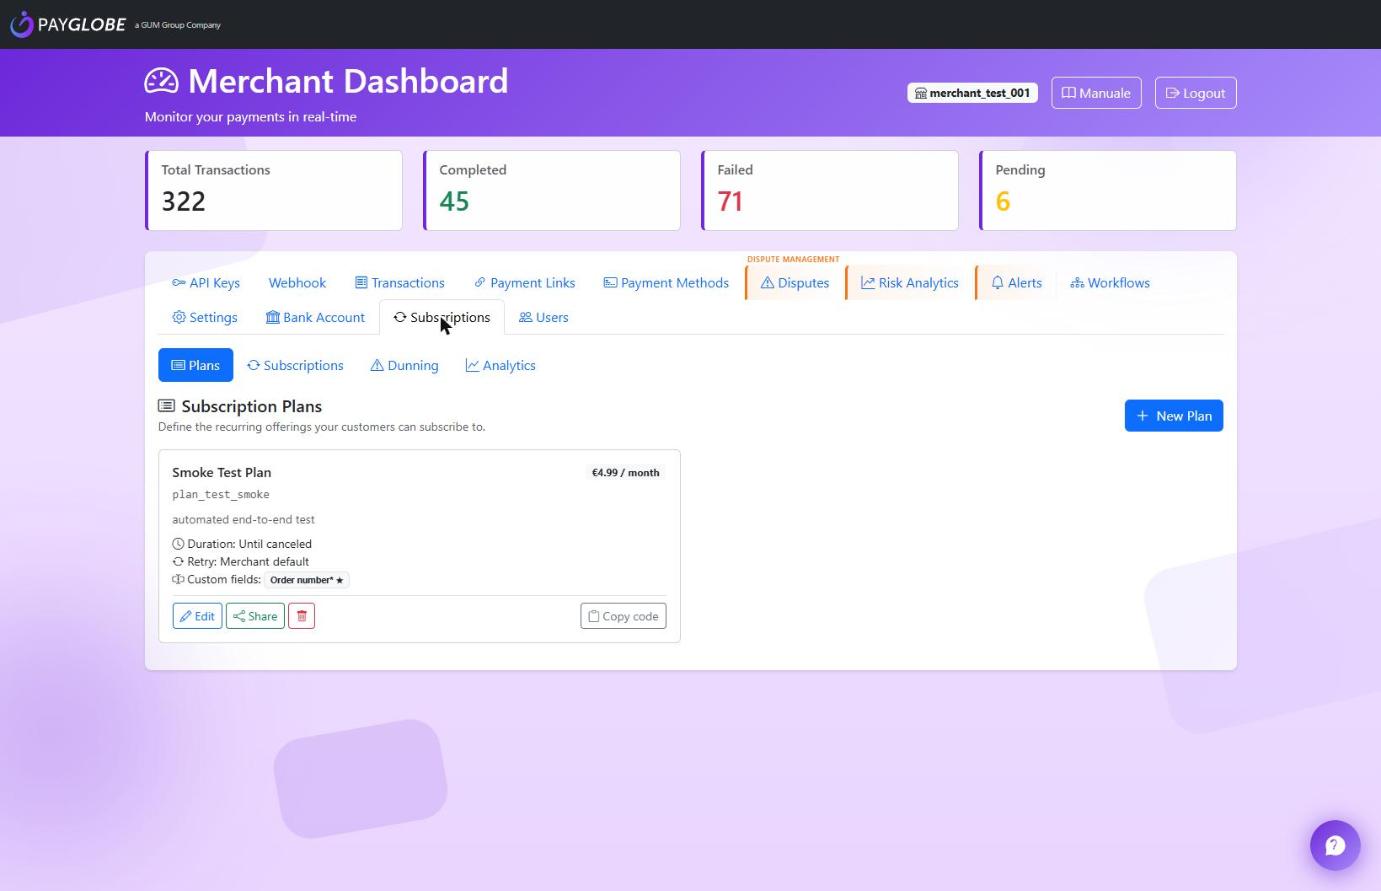
- Open the Subscriptions tab → sub-tab Plans → click + New Plan.
- Fill in name, price, currency and interval (e.g. €9.99 every 1 MONTH).
- Optionally set a trial (free days before the first charge), a setup fee or cancellation fee, and the duration (runs forever, a fixed number of cycles, or until a set date).
- Optionally add custom fields to collect at signup (order number, VAT, cost center…). Mark one text field as primary to have it auto-fill the
merchantReferenceon every webhook. - Save. The plan appears in the list with its own
code.
Step 2 — Get customers subscribed
There are three ways a customer ends up with a saved card and an active subscription:
- Share link (most common) — click Share on a plan to get a subscribe URL (with QR code and a copy button). The customer opens it, fills email + name + card + any custom fields, and confirms. You can personalize the link with
?ref=YOUR_ORDER_ID(flows intomerchantReference) and?customer=email(pre-fills the form). - New Subscription (server-side) — from the Subscriptions sub-tab, + New Subscription creates one and returns a checkout link to send the customer, for when you already have the order in hand.
- Import an existing card token — if the customer already paid once (or you tokenized at a POS), reuse that token instead of asking for the card again. The token must be MIT-eligible (allowed for merchant-initiated charges); a one-off token is rejected.
code for the API.Step 3 — Automatic billing & dunning
- At each cycle the gateway charges the saved token automatically (server-to-server, no buyer needed) and sends the standard webhook with the outcome.
- If a charge fails, the subscription enters Past Due and the retry engine takes over, following your retry policy (how many attempts, how many days apart, and what to do when they run out: cancel, pause, or mark unpaid).
- Optional dunning emails are sent before each retry, with a link for the customer to update their card.
- Every automatic charge also shows up in Transactions like any other payment, with its own payment ID and webhook.
Managing a subscription
From the Subscriptions sub-tab, the eye icon opens the detail; the row actions let you:
- Pause / Resume — temporarily stop and later restart billing.
- Cancel — immediately, or at the end of the current paid cycle.
- Change plan — move the customer to another plan, choosing how to prorate the difference.
- Retry now — force an immediate charge attempt on a Past Due subscription.
- Update card — replace the saved payment method.
Status reference
| Status | Meaning |
|---|---|
| Trialing | In a free trial; the first real charge hasn't happened yet. |
| Active | Billing normally on schedule. |
| Past Due | A charge failed; the retry policy is running. |
| Paused | Billing suspended by you; no charges until resumed. |
| Canceled | Ended by the customer, by you, or after the last failed retry. |
| Ended | Reached the end of a fixed-duration plan. |
Tip
Recurring charges need a merchant configured for tokenization (payment mode SALE_WITH_TOKENIZATION). To reconcile with your own system, set a ?ref= on the share link or a primary custom field: that value comes back as merchantReference in every subscription webhook, so you can join it straight to your order.
For developers
The whole flow is also available over the API (create plans, enrol subscribers, import tokens, pause/resume/cancel/change-plan, set the retry policy) with the same sk_ secret key — endpoints, webhook events and code samples are in the Partner API docs.
IGFS Adapter
If you already integrate directly against IGFS (N&TS/Nexi PGW REST),
you can move onto PayGlobe without changing any code. The IGFS Adapter
speaks the native IGFS wire protocol — same paths, same
txHead/txReq/txRes JSON, same HTTP-Signature, same IGFS_000 —
and routes everything to PayGlobe behind the scenes.
You change three configuration values and nothing else:
| Value | Before (real IGFS) | After (adapter) |
|---|---|---|
| Base URL | https://…netsgroup.com/MONEYNET_CG_SERVICES |
https://api.payglobe.it/MONEYNET_CG_SERVICES |
merId (= signature keyId) |
assigned by N&TS | issued by PayGlobe (max 16 chars) |
| secret (HMAC) | assigned by N&TS | issued by PayGlobe |
The path stays /MONEYNET_CG_SERVICES on purpose: the HTTP-Signature covers
(request-target), so changing the path would change the signed string and
force a code change. Only the host moves.
Supported operations
POST /pgw/payment/initGET /pgw/payment/verify(alias/verification)POST /pgw/payment/capture·/reversal·/refund
Tokenizer endpoints (/pgw/tokenizer/check, /pgw/tokenizer/delete)
are coming soon. Not available yet: /pgw/payment/selector,
pay-by-mail and checkout — calling one returns 404.
What you gain by moving
The buyer lands on the PayGlobe checkout, so your unchanged IGFS integration can accept methods IGFS does not have — Bizum, PayPal, Satispay, crypto. Your client still sees a normal successful IGFS transaction.
order block are not
forwarded yet, and those feed 3DS2 and anti-fraud: expect more authentication challenges
than with direct IGFS. And the async notification to your notifyURL may be
disabled depending on your merchant's webhook configuration — poll
/pgw/payment/verify, which is the authoritative source in IGFS anyway.
Full details, signature recipe and migration steps: igfs-adapter.html. To get test credentials, contact support@payglobe.it.
2FA Authentication
Two-factor authentication protects access to the dashboard.
2FA Setup
- On first login, you will be shown a QR code
- Scan the QR code with Google Authenticator or similar app
- Enter the 6-digit code generated by the app
- From now on, you'll need to enter the TOTP code at each login
Recommended Apps
- Google Authenticator (iOS/Android)
- Microsoft Authenticator
- Authy
- 1Password
Transaction Status Codes
| Status | Description |
|---|---|
| INITIATED | Transaction initiated, awaiting user input |
| IGFS_PREAUTH_SUCCESS | Card pre-authorization completed |
| VOUCHER_CHOICE_PENDING | Legacy status of the closed meal-voucher flow: no longer produced |
| COMPLETED | Payment completed successfully |
| FAILED | Payment failed |
| REFUNDED | Payment fully refunded |
| PARTIAL_REFUNDED | Payment partially refunded |
| CANCELLED | Payment cancelled by user |
Glossary
- ARN (Acquirer Reference Number)
- Unique transaction identifier assigned by the acquirer. Used to track the transaction in banking systems.
- Chargeback
- Forced refund request by the cardholder through their bank. Costs approximately €15-25 in fees plus the disputed amount.
- Dispute Rate
- Ratio between number of disputes and number of transactions in a period. Networks impose limits (Visa 0.9%, MC 1.0%).
- IGFS
- Internet Gateway Financial Services - Payment gateway for card transactions.
- Pre-Dispute Alert
- Early notification of a potential dispute, before it becomes a formal chargeback. Allows for preventive refunding.
- PSP (Payment Service Provider)
- Payment service provider that processes transactions (e.g.: IGFS, PayPal, Stripe).
- RDR (Rapid Dispute Resolution)
- Visa program for rapid dispute resolution through automatic refund.
- SCA (Strong Customer Authentication)
- Strong customer authentication required by PSD2. Includes 3D Secure for online payments.
- TOTP (Time-based One-Time Password)
- Time-based one-time password, used for 2FA authentication.
- Webhook
- HTTP notification sent by the gateway to your server when an event occurs (payment, dispute, etc.).
Support
Company Information
PayGlobe S.r.l.
Crafted with passion by engineers right on Lake Como
PayGlobe™ is a registered trademark.